(revised 21st July 2010; 17th November 2015)
1. Getting The Show Data Into FocusTrack.
Before importing the show into FocusTrack, you might want to pull the rig information from any other rig databases you're using - eg Lightwright - into RigTrack, so that FocusTrack knows what all of the lights actually are, where they're rigged, etc. There is information on this process here.
You then need to get the showfile data from the console into a format that FocusTrack can read.
With ETC Eos/Gio/Ion/Element consoles:
in the main menu, go File > Export > FocusTrack then specify a showname. This will generate a file with a name ending ‘.asc’. Move that file into the ‘from Eos’ folder inside the FocusTrack folder, and rename it Eos.asc.
With grandMA2 consoles:
FocusTrack now supports the grandMA2 range. Take a look here for details of how to get show data into FocusTrack.
With Strand 300/500-series consoles:
save the show from the console, run it through Strand's Showport utility to convert it to 'Comma Separated (*.csv)' format. In doing this, you must make sure that the showfile name in the console does not contain any punctuation characters, as Showport cannot deal with these correctly.
This process should give you ten files all ending with '.csv' - cuelist, cuelev, fxlev etc. Put these files into the 'from Showport' folder inside the FocusTrack folder.
With grandMA1 consoles:
Set up a QuickKey display, and make a QuickKey for the ‘Report’ function. Then:
- REPORT on your main show sequence - REPORT SEQUENCE number, then save that as file. You will end up with a file called ‘report.tar.gz’ (you may or may not see the ‘.gz’ depending on your computer’s display settings). Copy it to a USB stick or laptop. Rename it cues.tar.gz.
- REPORT on all of your palettes - REPORT PRESET 1 THRU 10, then save that file. You will get another file called ‘report.tar.gz’. Copy it to a USB stick or laptop and rename it presets.tar.gz.
[NOTE: the help file in some versions of FocusTrack says to rename this file to palettes.tar.gz. This is incorrect; presets.tar.gz is correct!]
- REPORT on your patch: REPORT CHANNEL 1 THRU last chan num, then save that as a file. You will get yet another file called ‘report.tar.gz’. Copy it to a USB stick or laptop and rename it patch.tar.gz.
On your computer, double click each file to uncompress them. You should end up with:
- one file, called ‘cues.csv’
- one folder, called ‘presets’, containing a bunch of folders with names starting ‘Presets’ and ending ‘.csv’
- one folder, called ‘patch’, containing a bunch of folders with names starting with ‘Devices’ and ending with ‘.csv’
Some uncompression software seems to add ‘.tar’ to the folder names; if you see that, edit the folder names so they are just called ‘palettes’ and ‘patch’.
PC Users: now for the bad news; you must change the ‘.csv’ extension on the ‘cues.csv’ file to be ‘.txt.’, then go into both the ‘Presets’ and ‘Devices’ folders and change the ‘.csv’ extension on each file to ‘.txt’. There are tools to automate this process, and we hope to have a more elegant solution in the future. Mac users do not need to do this.
Once you have the names right, copy the file and two folders into the ‘from grandMA’ folder inside your FocusTrack folder.
With all console types:
Then, run FocusTrack. From the main menu, pick the console type, then and go to ‘Console ‘Import’.
There are a selection of options here that govern how FocusTrack imports your showfile and deals with the information it finds; you can find more about these settings here.
Generally, the following settings are the most useful:
Cue List(s) To Import: With MA and Eos showfiles, FocusTrack can now import more than one cue list. For single cuelist shows, specify the console cuelist number you want to import here. Further information on importing multiple cuelists will appear in a separate Tips page soon. Strand showfiles only have a single cuelist, so this option does not appear.
Min Int % Counting As On: FocusTrack works to figure out which cues lights are actually used in. If a light is preheating in cue 1 for cue 2, it's actually used in cue 2, so you might not want cue 1 to count as a 'used' cue even though the light is technically on. So here you can set the minimum level to count as on - ie. if you use 5% as a preheat level, set this to 6%
Start Cue: Usually the first cue number in the show.
End Cue: Usually the last cue number in the show; this lets you exclude rig check cues and other things at the end of the cue list.
Process Pan/Tilt Only: Checking this option dramatically speeds up the import time into FocusTrack, as FocusTrack only processes pan/tilt for each light, rather than worrying about all of the light’s attributes. The downside is that you can’t then see any information about how other attributes are used in RigTrack’s ‘Usage’ screen. If you only have a small show, leave this option unchecked. If you have a really big show you might want to check this option if you’re just interested in positions and are re-importing the show repeatedly (eg. during tech), then uncheck it for a final import to get information about all of the other attributes.
Look for Pre/Postset Posns & Live Moves: Check this box; this lets FocusTrack look for positions that aren't actually on in cues, but are used as start or end positions for cues where lights move live to a position as fading up or fading out.
Import console patch: Check this box; this means that you'll get the actual patch from the console rather than the version imported from Lightwright or entered by hand in RigTrack, as well as other information that Lightwright doesn't know about, eg. pan/tilt inverts on moving lights.
Quit after completing import: Check this box; with big shows, FocusTrack will take a while to process the show, and is best left to its own devices while doing so (ie. start it running at the start of a dinner break or overnight). This option means that when FocusTrack is done it will quit, making sure that all of the information is safely written to disc. (‘Big show’ means lots and lots of lights and lots of cues; import time also varies depending on the console type you’re importing from and the speed of your computer.)
Once you've set all of the options, hit MAKE/UPDATE FocusTrack.
(Note: some PC users report that their computer’s power saving or sleep modes don’t notice that FocusTrack is running, and so put the computer to sleep while FocusTrack is trying to import it’s show data, causing merry mayhem all round. If you’re importing a big show, you should make sure that these modes are temporarily disabled to avoid the chance of this happening. Mac users do not seem to suffer from this problem.)
When it gets done (or after you re-run FocusTrack if you set it to quit once finished), you should see all of the focuses you use inside FocusTrack, the rig inside RigTrack, and the cue list inside CueList ('Go To CueList' from FocusTrack's main menu screen).
In each case, you can sort the information by pressing the button at the top of a column, or quickly find things by pressing the "QF" ('QuickFind') button at the top of each column.
2. Adding Show Information
Having got this information in, you really want FocusTrack to know about which scenes and scenery focuses relate to. You do this by adding scene/scenery information to Cue List.
The first thing to do here is to make it easier to see where scene breaks are in the show. To the left of each row are two check boxes, one in dark blue, one in light blue. Check one of those boxes and the row will be shaded either dark blue or light blue. Generally, use dark blue for new scenes, light blue for things (eg. songs) within that scene. These markers are also used for the 'Goto Scene' and 'Goto Sub Scene' buttons that let you jump around the cue list without having to remember cue numbers.
If you have done anything in the cue text in the console to indicate new scenes or songs, you can automate this process. For example, you may use '------ SCENE NAME' to mark the start of a scene in the console. You can have Cue List look for things and use these to indicate the start of scenes. Hit the 'Auto Sc Brk' button at the top of the screen then type the 'scene break' text (eg. for this example, you'd type '------') and it will mark the scene breaks for you automatically.
Once you've done that you need to tell FocusTrack the name of a scene, and any scenery used in that scene. You'll see two columns on the right called 'Scene' and 'Scenery'.
In whatever cue a new scene starts, enter the Scene name into the 'Scene' column.
In whatever cue new scenery appears on stage, enter the Scenery name into the 'Scenery' column.
Note that you only need to do this in cues where the scene or scenery changes, NOT in all of the cues in that scene or where that scenery is set on stage.
Once you've done this, you need to pull that information into FocusTrack. Switch back to FocusTrack, make sure all of the lamp focuses are selected (press 'Show ALL'), then go into Utilities, enter the Start Cue (first cue in the show) and Last Cue (highest cue number used in the show, as before), then press 'Auto-Fill Scene from CueList' then 'Auto-Fill Scenery from CueList'.
Once you've done this, when you switch back to Data Entry List you should see that the Scene and Scenery columns are now filled in for each lamp focus.
3. Adding Information
You can now manually add any information you want - ie. descriptions of focuses or the use of lights, or you can do this later. Up to you.
4. Controlling The Console
Ideally, you want FocusTrack to be able to control the console, so when you are taking pictures you don't have to do lots of typing or having someone on the console bringing up channels. This only works on a Mac, and requires an application that can talk to the console - xConnect for Strand consoles, the Eos client for Eos, onPC for grandMA (onPC is PC only, so you’ll have to run it in a PC emulator such as Fusion or Parallels).
Configure the client software to talk to your console as per the manufacturers instructions. With onPC, be sure to have ’shortcuts’ turned off, and be sure to click in the command line area before switching back to FocusTrack. With Eos, you may need to toggle the setting of scroll lock in the client software.
Then go to FocusTrack Preferences and make sure that:
- Working Mode is set to ‘Online, sending control to console’
- Control Application is set to match the application you are using (usually xConnect, Fusion, Parallels, Virtual PC, or Eos Family if you’re using the Eos 1.9 Mac client software)
- If you are using VirtualPC, that ‘PC in VirtualPC’ is set to match the PC setup you are using within VirtualPC.
- If you’re using a Strand console, that Console Command Line is set to match the command line setting in the console (single digit, double digit, command line).
There is a speed issue with some setups (usually involving xConnect) on some Macs and in some network environments whereby FocusTrack tries to talk to quickly and the console can’t keep up. If you see this happening, use ‘Console Communication Delay’ to slow FocusTrack down a bit - start with No Delay, but if necessary try Small Delay or Long Delay.
With this all set up, test it to see if it works: run your console connection application and make sure it is talking to the console, then go to 'Photo Shoot mode in FocusTrack, select a lamp focus (click in that row), then press 'Turn Light ON'. If all goes well, you should see typing appear in your console control application and the light you have selected come on in the position you have selected. Press 'Turn Light OFF' and the light should go off again.
Assuming it works, you're ready to take pictures.....
5. Photo shoot - Introduction
The aim in the photo shoot is to take a picture of every light in every focus its used in; FocusTrack calls one light in one position a 'lamp-focus'. Ideally you want every lamp-focus to be photographed in the scenic set-up its used in in the show (apart from any general 'wash'-type focuses which aren't tied in to any specific scenic set-ups).
While FocusTrack could potentially automate the whole process - turn on the light, trigger the camera, pull the picture in to the right place, turn off the light, repeat - that's not the way most people use it. Because it is useful having a person in the light in every picture, and it is unpredictable how long that 'walker' will take to get into position, it is usually best to trigger the camera manually. And because pulling the file from the camera into the computer after every shot tends to be quite slow and time in the theatre for the photo shoot is usually limited, it is usually most efficient just to leave the photos in the camera during the photo shoot then upload them all later.
To facilitate this, FocusTrack keeps a record of the order in which you take pictures. Where this works best is when you start at picture 1 work through to picture 1000 (say) without interruptions: in that case you can just tell FocusTrack that the first shot is called 'IMG_1038.jpg' (or whatever) in your camera, and it can figure out what the next 1000 shots are called.
Sadly, life is often not that perfect - you get interrupted for lunch, a light breaks, you have to change th order you're working in, you take a duff picture, etc. To help you then sort out the pictures later FocusTrack also has a thing called a 'Photo Session'. This is just a way of breaking down a big group of pictures - so you might do Session 1 first, and that might be a continuous set of photos until lunch (say 200 pics). Then during lunch you might take some pictures of the restaurant. After lunch start at session 2, etc.
Now when you import the pictures from your camera, shots 1-200 are FocusTrack pictures, but the next ten pictures are pictures of the restaurant. These are of no interest to FocusTrack, and it has no way of knowing about them. But you'd be able to import all of the pictures for Session 1 automatically, then look in your camera and realise that session 2 actually started at image IMG_0211.jpg and so tell FocusTrack to start importing session 2 from there.
Sessions are really a tool for giving yourself a 'reference point' or 'sync point'; whenever a photo session gets interrupted, you should start a new session number.
You can also enter the photo file name generated by your camera as you take photos - after you’ve entered the file name of the first photo, FocusTrack will automatically generate the next sequential number, but you can over-ride it with a different file name at any time if you need to.
6. Photo shoot - Camera Setup
The temptation with focus photographs is to take the highest resolution pictures offered by the camera you're using. However, with modern cameras offering very high resolution this can make for an enormous file set by the time you've taken 1000+ pictures on a big show. In fact, because the pictures are often high contrast (bright light against a dim background) the highest resolution often turns out not to be necessary. In many cases 'medium' resolutions - about 800x600 or thereabouts - usually produce results which convey all the information required about the focus.
Also, while you don't necessarily need to use an expensive digital SLR or expensive lenses, the advantages such cameras offer are usually in operating speed (they take - and then store - pictures quickly), versatility of manual settings (since typical stage lighting conditions confuse many camera meters!), and battery life - the ability to just keep going through a long photo session.
Other things to note:
- Usually you'll want some 'ambient light' in the picture so that you can see the light against scenery rather than just as a white patch against a black background. If your worklights are on dimmers it's relatively easy to adjust this to give a suitable background, then 'hold' those lights.
- You may want to set your camera to its 'K' colour temperature setting - ie. colour balanced for tungsten - which often seems to give the best results, though it will be worth experimenting with this for your particular camera and rig.
- It is often best to set up the camera to give a fixed shot of the stage rather than zooming in for particular lights etc. The exception to this is sidelight which it can be useful to photograph from the stage looking into the wings rather than from front-of-house (especially 'invisible' crosslight).
- You really, really, really need to use a tripod.
- A remote trigger for the camera is useful both because it reduces any camera shake from pressing the trigger button AND it means you don't have to keep your hand above the camera for long periods, which is tiring.
- Exposure etc will vary with your lights etc. As a rough guide, many shows seem to end up with the camera set to about ASA800, maximum aperture (perhaps f3.5, depending on lens), and a shutter speed of about 1/8th second. You really need to set this manually as the camera's metering will get confused about the bright light vs dim background setup, so take some test shots to get the best results. Once you've got an exposure that works you can usually just lock this in and it will work for all of your shots. If possible aim for a faster shutter speed by going for a higher ASA to reduce any possible shake in the camera. Just to re-iterate, with shutter speeds this slow, you really, really need to use a tripod.
- Make some test shots with the worklight on stage and a light or two to find the optimum settings.
- Make a note of all of the camera settings (exposure and lens zoom) AND the position of the tripod (seat row, number) so that it's easy to replicate the setup if you have to do so later.
- The two things that usually run out first in a photo shoot session are the camera's battery, or the space on the memory card. With smallish pictures and big memory cards, it's usually the camera's battery. You can extend the life by turning off the camera's display or 'show every picture after it's taken' options once you've taken a few pictures and seen that the results are turning out OK. Beyond that, don't forget your charger and charge at every opportunity! (or use a mains adaptor for the camera if it offers that facility).
7. Photo shoot - Console Setup
In taking focus pictures, you should generally aim to photograph all of the lights in OPEN WHITE, to make them stand out as clearly as possible. However, if a light is used in a gobo in a particular edge focus you'll want to see and record that gobo and that softness etc.
To facilitate this, when you use FocusTrack to control the lights what it actually does is:
- set the light as it is in the first cue that lamp-focus is used in (the equivalent of typing '1@CUE 1')
- sets the light to FULL.
This means that if the light is in a colour in that cue, it will be set to that colour. This is bad!
To get around this, before the photo session, use the console to HOLD or PARK anything that you don't want set by FocusTrack- usually the colour attributes, the lamp timing attributes, and the strobe attribute Make sure all of the lights are in their home/open white position then:
On Strand 300/500:
1.2 THRU (last channum).2 HOLD
1.11 THRU (last channum).14 HOLD
1.17 THRU (lastchannum).19 HOLD
1.41 THRU (lastchannum).41 HOLD
On Eos:
First Chan thru Last Chan (filter: colour and any other parameters you want to hold) PARK *
On grandMA:
Use the World function to make a World excluding the parameters you don’t want to have FocusTrack control.
On all consoles:
Don't forget to unhold or unpark everything after the photo session and before running a show.....
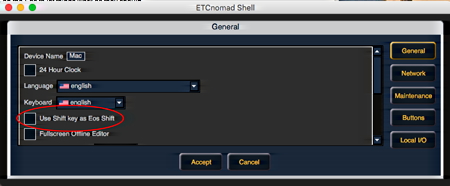
Also, on Eos software 2.3 later, you must go into the Client/Nomad software’s Shell Settings page, and ensure that ‘Use Shift key as Eos Shift’ is UNCHECKED.
8. Taking Pictures
After setting up the camera, the console and the 'ambient light' conditions as above, you need to start taking pictures. To do this, you need to sort the lights in FocusTrack to the best order for you. This will vary depending on how you're working - for example, you could do it by light (click on 'Chan' column heading), or in show order (click on 'First Cue' column heading), but the most efficient way may be by scenery since if the same set is used in act 1 then again in act 2 you can do both sets of pictures at the same time rather than having to set up that scenery twice.
To get going, make sure xConnect is running and talking to the console. Make sure the camera is setup correctly. If you've taken some test shots, do some kind of 'marker' picture to indicate that you're about to take the first real picture - something you can identify easily later (for example, take a picture of your hand in front of the lens).
Go to PHOTO SHOOT mode.
Sort by SCENERY to see which scenic setups you need.
Once you've found the one you want to start with, go 'QF' above Scenery and just find that scenic setup.
Now sort by whatever you want - perhaps by first cue, though it doesn't really matter since FocusTrack will remember the order you take the pictures in
(Note: Some sort orders can lead to a lot of walking for the poor person on stage, particularly for focuses where chan 1 is focussed to the opposite side of the stage from channel 2! To try to minimise this go Main Menu > Special Sorting then 'Sort by Pan/Tilt'. This will attempt to give you an order that minimises the amount of walking the person has to do, though the results are not perfect!)
Back in PhotoShoot, press PHOTO SHOOT LOOP CONSOLE.
FocusTrack will ask for a session number. Start at 1....
(FocusTrack may also give you a warning about positions used in effects - see below).
FocusTrack should talk to the console, set the light to the right position, turn it on. It will show you the light and focus on screen. If you want to add a description of the focus now, you can.
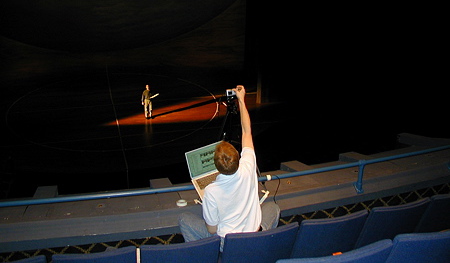
Get a person to stand in the light, head centred in the beam.
Take the picture.
CONTROLLING YOUR CAMERA: If you want, you can have FocusTrack trigger your camera for you. To do this, you have to have your camera connected to your computer, and be running the camera manufacturer’s camera control software with an option to remotely trigger the camera (eg. Canon’s ‘Eos Utility’ software for controlling Canon Eos cameras). By default, FocusTrack will control Canon’s Remote Capture utility. More recently, people have found success using the Image Capture application supplied as standard with every Macintosh; more information on that here. For information on controlling other cameras. please contact us.
Once you have this setup, check the box beneath the camera icon in Photo Shoot Loop mode to have FocusTrack trigger your camera.

NEW FROM FT2.118: If you want to (and if your camera gives you this information), you can enter the photo file name as part of this process. FocusTrack will generate the next sequential filename when you get to the next picture, but you can over-ride this at any time if you have to break the order you’re working in. When specifying the file name, make sure you get the full name, and get any capitalisation correct (eg. ‘IMG_001.JPG’ rather than ‘img_001.jpg’). If you want to, you can just specify the number; FocusTrack (from 2.119 onwards) will let you add other text to the beginning (IMG_) or end (.JPG) of the number if necessary, and convert the whole filename to upper- or lower-case if necessary.
When you’re ready after each picture, hit 'OK' or press Return.
FocusTrack should now turn off that light, turn on the next light.
Repeat.
If you can't take a picture of a lamp-focus for some reason, press 'Skip Lamp' so FocusTrack knows you didn't take that picture. If you want to stop, press STOP, otherwise FocusTrack will keep going until it gets to the end of the selected lights.
NEW FROM FT2.123: FocusTrack normally takes a separate picture for each light in each focus its used in (each ‘lamp-focus’). However, sometimes you also want to see how all the lights in one focus interact with each other - ie. what a complete wash looks like, as well as what each individual light is doing. FocusTrack now has an option to help with this: if you sort your lamp-focuses by position before taking pictures, then check the ‘Wash Pic’ option, FocusTrack will take a picture of each individual light in the focus, then will turn on all of the lights in that focus and take a picture. When you import pictures, these wash pictures will be imported into the ‘Wash Picture’ field.
Once it gets to the end of all the lights you’ve found, FIND another set of lights and repeat the above with a different session number (every time you press 'PHOTO SHOOT LOOP CONSOLE' FocusTrack will automatically offer the next session number).
Repeat until you get done....
During this process, you can see any lamp-focuses you haven't taken the pictures of yet either by looking for lights that don't have a checkmark in the red 'Pic?' box in Photo Shoot mode, or any lights which don't have a session or pict number.
9. Conventional Lights
You can do exactly the same process to photograph conventional lights, using the Photo Shoot mode in RigTrack instead of in FocusTrack. It works in exactly the same way. Depending on how the day goes you can intersperse conventional and moving light pictures (each has their own session numbers, but if you intersperse you may want to make sure that the session numbers are unique) or do all of one then all of the other. The latter is more efficient in terms of sorting through pictures, the former more efficient in terms of moving scenery.
10. Additional Photos / Lights FocusTrack Won't Turn On Automatically
It can be useful to take some additional pictures - eg. for lights used as a wash it can be useful to take pictures of the lights all on together as well as each light individually. FocusTrack doesn't offer a way of doing this automatically, so you'd have to figure out which washes are important and turn the lights on manually at the console (or via xConnect), then take the picture, then get the picture into FocusTrack manually later on....
In addition, for any lamp-focus that is ONLY used in an effect, FocusTrack has no way of turning the light on in that position automatically (since the syntax '1@FX1' doesn't work in the console). It warns you of that during photo shoots. Once you've done all of the other lights you'll have to set those lights to those positions manually (1@GROUP xxx etc) then take the pictures.
11. If The Console Link Doesn't Work Properly
As mentioned above, there have been some cases where connection from FocusTrack to the console is so slow that it becomes unreliable or even unusable. It's never really been possible to pin down the circumstances where this happens - it’s dependent on your Mac’s speed, which system software you’re using, whether you’re using a wired or wireless link to the console etc. You can adjust the speed at which FocusTrack tries to talk to the console as noted above to work around this. It seems to be much better on newer Macs, and improved again under Mac OS 10.6 Snow Leopard.
Worst case, though, if it all gets too slow is that you put someone on the console and have them type commands. In that case, use PHOTO SHOOT LOOP MANUAL instead of PHOTO SHOOT LOOP CONSOLE. When FocusTrack then says that you're doing channel 1, first cue 100, they'd then have to type '1@CUE 100' then '1 col open' then '1@@' to get the light in the right position, in open white and at full (on Eos: 1 Recall From Cue 100, 1@FULL). This is less slick than having FocusTrack do the work, but it is a worse-case scenario with the Strand consoles. Of course, this does also let you work through the process with consoles other than those supported directly by FocusTrack.
Also, it has been reported that using FocusTrack to control the console does not work at all well if FocusTrack and the console software are in different Spaces on your Mac; for best results, ensure that both are in the same space.
12. Getting The Pictures In To FocusTrack / RigTrack.
Once you're done, you need to get the pictures into FocusTrack and/or RigTrack:
- Transfer the pictures from your camera to your computer as you would normally do
- Put the pictures into the 'Focus Pics' folder inside FocusTrack
- You then need to tell FocusTrack the file name of the first picture - unless you entered the first picture filename while taking pictures, in which case FocusTrack will know the filenames and you can skip the next few steps. Again, if you've taken your pictures in order with no other pictures interspersed, this is easy. If you've mixed in other photos, it's a little harder. The safest way is to do it session by session:
--- in Photo Shoot mode, 'Sess' QF for a session number, starting at 1
--- Press 'Set Pic Filenames'
--- Enter the file name of the first picture for this session - usually something like 'IMG_0001.jpg'. Be careful with capitalisation. You can look at the photos using your image editor software of choice if you can't remember which is which.
--- FocusTrack will fill in the subsequent file names.
--- Repeat for all other sessions; if you need to look manually to see where the first picture for a session is, note the photo name for the last picture of the previous session then use an image editing program to look at photos around that file number to check you have the correct image
--- Once you've done this for every session, hit Import Pics to have FocusTrack pull all of the pictures in to place.
You can speed up this process for any sessions where you KNOW there are no extraneous pictures in between - ie you can QF sessions 1-10 by going '1...10' in the QF box, then just specify the photo name for the first picture of the first session.
FocusTrack 2.118 Onwards: If you specified the photo file names while you were taking the pictures, you can just hit ‘Import Pics’ straight away, without having to do anything else. If you just specified the numbers, you can use the new ‘Add Prefix’ or ‘Add Suffix’ buttons to add ‘IMG_’ or ‘.JPG’ to the number; if you need to change the capitalisation of the file name you can use the new ‘Filenames Uppercase’ or ‘Filenames Lowercase’ buttons, all in the Photo Shoot screen from FT2.119 onwards.
You'll need to repeat this process in RigTrack for any conventional pictures.
13. Adding Other Pictures Manually
You can add other pictures (eg. multiple-light wash pictures) manually. Once you've identified a picture, go to 'Big Picture' display for that lamp focus. Next to the 'alternative view' and 'as part of group' picture boxes there's a '<' symbol. Press it and FocusTrack/RigTrack will let you select the picture you want manually. As part of this be sure to check 'store only a reference to the file'.
You can use this same approach to add scans of manual focus drawings etc if necessary.
[NOTE: FocusTrack only stores references to the photo files, NOT copies of the files themselves. It does this so that the main FocusTrack file doesn't become enormous with copies of the files that are already on the hard drive. However, this means that you have to move/copy the entire FocusTrack folder, not just any FocusTrack data files, for the copy to contain the images].
14. Cue Pictures
FocusTrack can also store cue pictures; these appear in Cue List, and also appear in the 'Cue Picture from Cue List' box in FocusTrack when you have a cue selected. The process for importing pictures is much like the above. It becomes easier if you have FocusTrack keep a record of which cues you actually photograph (since you may not do follow on cues or you may miss some cues). To do this, go to 'Import Cue Pics' mode and press the 'Omit Parts' button. Then click in the first cue. As the show runs, if you take a picture of a cue press 'Pic Taken, Next>', and if you don't take a picture just press 'Next'.
FocusTrack 2.118 Onwards: FocusTrack 2.118 introduced a new ‘Photo Shoot Loop’ function for taking cue pictures; it’s in the Import Cue List screen in Cue List. Click in the cue you want to start with then hit ‘Photo Shoot Loop Manual’. FocusTrack will ask you for a session number and the file name of the first photo (which you don’t have to specify if you don’t know it). It’ll then tell you to press enter or click ‘OK’ at the same time as you press ‘Go’ to run the cue on the console. It will then wait until the cue is complete and either tell you to take the picture or, if you’ve configured it to trigger a camera automatically (by checking the checkbox beneath the camera icon, and configuring FocusTrack to trigger your camera control software), taking the picture automatically. It will then wait for you to press enter when you press Go for the next cue. FocusTrack will use cue times and cue delays to figure out when a cue is complete; it will also use wait/follow times to automatically figure out the time for follow-on cues. If cues are called so that they overlap you can force the picture to be taken by either clicking the ‘Take Picture Now’ button or pressing the shift key.
When you get done, press 'Show Cues with Pics' then 'Set Photo Filename' to set the file names (unless you specified the photo file name while taking the pictures), then 'Import Photos' to import the pictures. You can also import pictures to cues manually, as above.
Again, for documentation purposes it is generally best to set the camera to a fixed, wide-view of the stage rather than attempting to zoom in/out to follow the action. You may need to alter the exposure more here than during the focus photo shoot since there will be a wider variation in light levels from cue to cue than from open-white light to open-white light. Also, you should make sure anything that could be distracting to cast or audience, mainly flash but also the 'focus assist' light that some cameras offer - is turned off. Beware: some cameras, particularly compact cameras, turn the flash back on any time they put themselves to sleep. It can be very embarrassing if the flash fires when you take a picture with an audience present!!
Note that there may be union-related issues with regard to photographing a professional show in this way; if in any doubt please check with your Company Manager or show management. Generally as long as you explain that the photography is for archival or documentation purposes you should be OK, but best to check!
Hopefully that will help you get going. If you do have any questions or if we can help in any other way then, as always, please get in touch.